Organic Pest Control: Threelined Potato Beetles, Colorado Potato Beetles, and Japanese Beetles

I could never imagine spraying inorganic chemical pesticides on vegetables or herbs that I am growing in my own raised vegetable beds. This year, two beetles have started to attack my potato plants.

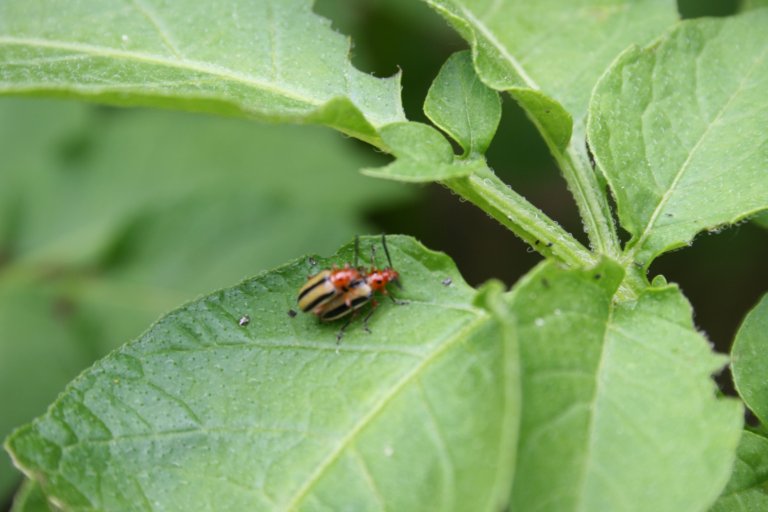
The more numerous of my beetles are the smaller (pictured) Threelined Potato Beetles (Lema trilineata).

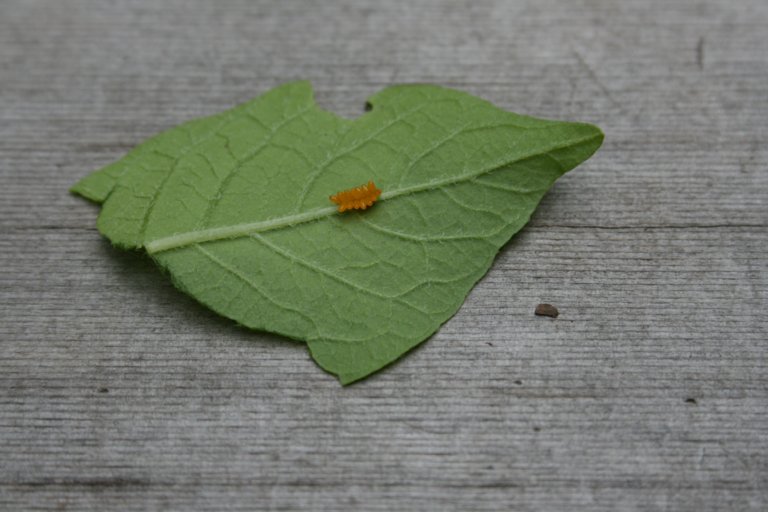
They lay small yellowish eggs (pictured) on the underside of the potato leaves.
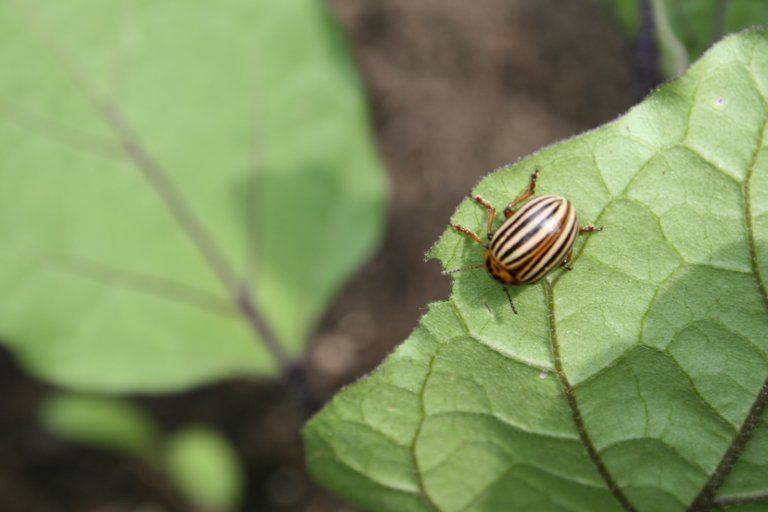
The other, larger beetle is the Colorado Potato Beetle (Leptinotarsa decemlineata).

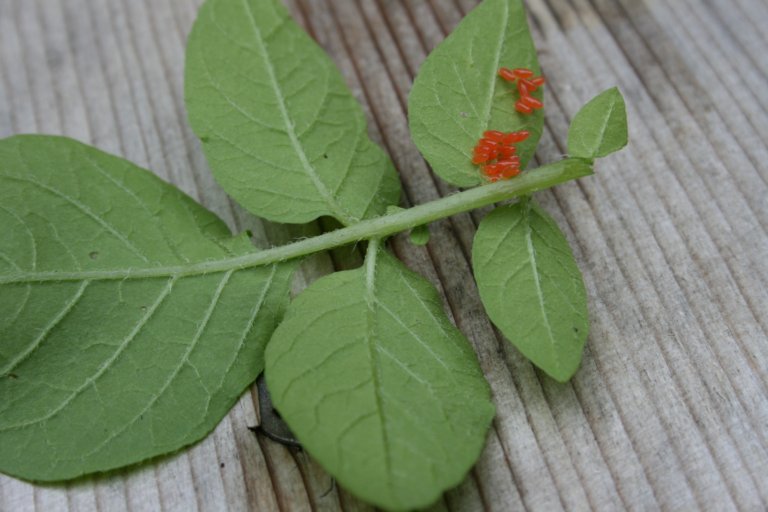
These beetles lay somewhat larger, orange eggs (pictured), also on the underside of the potato leaves.

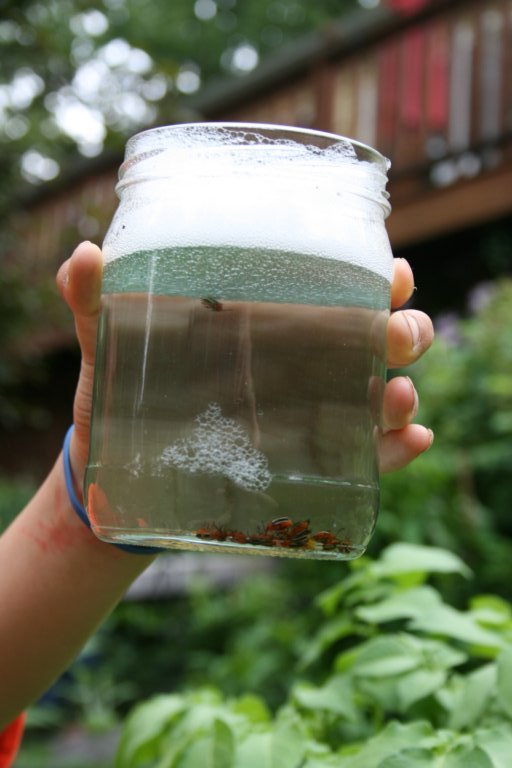
Organically controlling the beetle population is something that I have taught my children how to do, includes them in the vegetable tending process, and is an activity that they enjoy. Here’s how to do it:

1. Fill a jar with soapy water.
2. Hold the jar under any beetles that you see.
3. If you bring your hand close to a beetle, it will have a natural flight response of dropping to the ground–or in this case, into your jar.
4. Once they fall into the soapy water, they lose the ability to fly and quickly sink to the bottom; in 5-10 minutes, you can rid yourself of dozens of these pests.
5. As for the eggs, check the undersides of your leaves; I find them sticky and difficult to remove, so I just tear off the leaves and stick them in the water too.

Side note: This method also works on the Japanese Beetles (Popillia japonica) that attack my roses in July.

What I’ve Learned About Growing Tulips in New Jersey: Protecting from Squirrels and Deer, Planting in Clay Soil, and Creating Colorful Combinations

One of my favorite spring flowers at this time of year is the tulip. Because of the squirrels, deer, and clay soil in my area of New Jersey, few of my neighbors grow tulips, but it can be done. Here are some lessons that I have learned over the past few years on growing these beautiful flowers in my less than ideal conditions. For me, it has been well worth the effort.

~
1. Protecting Tulips from Squirrels and Deer. In the fall, to protect the bulbs from being eaten or dug up by hungry squirrels, I soak them in deer repellent before planting. In the spring, to protect the tulips from being nibbled by the deer (my friend calls them rodents with antlers), I then regularly spray them with deer repellent as soon as the bulbs begin to emerge.
~
2. Growing Newer and Heirloom Tulips in Clay Soil. Because tulips naturally like dry, warm summers, there is a big difference between the newer varieties that have been bred mainly for commercial cutting and the heirloom varieties that were bred to actually be grown in people’s gardens.

~

The newer varieties spoil if I keep them in my moist, clay soil year-round. To over-summer them, I remove the bulbs after the show is over to a less prominent area of the garden so the foliage can continue to make energy for the bulb. Once the leaves have died down naturally, I dig them up and store them in a dry cupboard until it’s time to re-plant them in the fall.

~

In contrast, the heirloom varieties are much more tolerant of my less-than-ideal clay soil. I find that about three-quarters of them will survive the summers in the ground. In the areas where I grow them, like the Rose Garden (pictured), I simply plant enough new bulbs each fall to compensate for the expected loss. A mix of orange tulips including General de Wet, Orange Favorite, Princess Irene, Dillenberg are planted with Black Parrot as a dark purple accent.
~

3. Creating Colorful Combinations of Tulips. Inspired by the Granny Mix offered by Old House Gardens, the last two years I’ve been mixing up my own tulip combinations to remind me of the old mixtures found in cottage gardens or old time front door gardens. I have ten varieties of tulips chosen for a range of color, height, and form which bloom April and May. My own mix is planted in the front of our house (pictured). It consist of the following tulips: Ballerina, Queen of the Night, Couleur Cardinal, Princess Irene, Kingsblood, Mariette Cum Laude, Maureen, Mrs John T. Scheepers, and Dordogne.
~
Under a pink flowering crabapple outside the Children’s Garden, I planted Christmas Dream, Big Smile and Menton. I must say that originally, I did not like the apricot color of Menton, but as it matures it is absolutely beautiful, particularly because it picks up tones in the red foliage of the crabapple as the leaves elongate.

~

On Lilac Hill, I planted the String of Pearls combination from White Flower Farm along with Lilac Perfection, Monte Carlo, Blue Diamond, and Violet Beauty. The String of Pearls collection contains Mount Tacoma, Maureen, White Triumphator, Spring Green, and Calgary.
~

Advice Wanted: How to Keep Rabbits Out of the Garden

I need some help and advice from my fellow gardeners. I have always had the occasional rabbit in the garden, but nothing too damaging. This year, I have a rabbit infestation and he or she is eating everything in sight. I wasn’t sure who the culprit was, but then I saw the rabbit shamelessly eating my new plants in broad daylight. From what I’ve read, it seems that the options are guns (not practical in the suburbs), fences, traps (my husband’s weekend assignment), dogs/cats (not an option right now), and repellents (I am currently spraying both commercial and home-made repellents). Some gardeners on GardenWeb also suggested spreading human hair, sprinkling pepper, and planting plants they do not like, such as nepeta (catmint). Does anyone have insight into which of these or additional suggestions will work?

Update April 25, 2008: May Dreams Gardens has a lot of experience with rabbits and suggests sprinkling cayenne pepper on the plants that need protection.

Update May 10, 2008: Thank you all for the suggestions–some of them are working. First, I sprinkled the cayenne pepper on the most susceptible plants and the rabbits are staying away from them. Second, I captured my first rabbit in a rabbit trap baited with one of their favorite foods–clover.

Related posts: Keeping Groundhogs Out of the Garden, Keeping Deer Out of the Garden

Gardening Blogs and Groundhog Control: Garden Desk and Veggie Gardening Tips

In my ongoing research on how to fight my the battle with my next door neighbor’s groundhog, I came across two blogs from experienced organic vegetable gardeners: Garden Desk (http://www.gardendesk.com/) and Veggie Gardening Tips (http://www.veggiegardeningtips.com/).

You can read two of their entertaining and informative groundhog posts here:

Garden Desk tries a scarecrow – http://www.gardendesk.com/2007_08_01_archive.html

Veggie Gardening Tips talks with his groundhog (before trapping him/her) – http://www.veggiegardeningtips.com/conversations-with-a-woodchuck/#comment-55557

*****

Follow-up: Doug over at Doug’s Green Garden (http://blog.douggreensgarden.com/) just gave me another “organic” suggestion (no guns, poisons or traps) that we’ll have to try –
http://www.beginner-gardening.com/groundhogs.html

Maintaining a Pebble Path and Keeping the Groundhog Out of the Cutting Garden

It was a wonderful day in the garden. The weather was warmish in the sun and there was very little wind. My husband and I worked today on the path in the Egg Garden that leads to the Cutting Garden. First, we added more pebbles–ten fifty pound bags or river stones–which is an annual necessity to maintain a good looking pebble path. Then, we replaced the temporary groundhog deterrent I had put down last year at the gate.

In the Cutting Garden, I grow some of the groundhog’s favorite foods: Queen Anne’s lace, purple cone flower, and phlox. Knowing this, when I created the Cutting Garden, I dug around the border of the fence about two feet deep to install a chicken wire barrier which the groundhog couldn’t get through. You can see some of this chicken wire sticking up out of the earth in the picture above.

However, one spot was left without the barrier: the area where the gate goes into the garden. It took a few years, but the groundhog, who lives next door, discovered last year that he could dig under the gate. Looking for some immediate protection, I simply pegged a piece of chicken wire on the ground under the gate extending one foot on each side. I suppose he found enough food elsewhere that he didn’t take the effort to dig underneath this barrier, but it had two problems: it was not attractive and it easily caught on the gate or your foot as you passed through.

Our project today was to replace the temporary chicken wire with three rows of six by six inch terracotta blocks that we were using for stepping stones in other places in the garden. While digging the space for the new barrier, I discovered more terracotta blocks and chicken wire that I must have buried in an earlier attempt. We placed the new blocks level with the fence (almost touching) over all the existing material for extra protection.

I don’t know why it took me so long to do this. Everything looks a lot neater now and I will no longer have to worry about tripping as I leave and enter the garden.
~
For a picture of the groundhog barrier around my vegetables, click here:
http://heirloomgardener.blogspot.com/2007/12/raised-vegetable-beds.html
~
For a prior post on the path to the Cutting Garden, click here:
http://heirloomgardener.blogspot.com/2008/01/egg-garden-path-makeover-replacing.html
~
For a prior post on keeping deer out of the backyard, click here:
http://heirloomgardener.blogspot.com/2007/12/keeping-deer-out-of-backyard-deer-fence.html

Organic Rose Gardening: Dormant Oil Application for Pest Prevention

Dormant oil application to my roses is the most important pest prevention task for me as an organic rose gardener. The dormant oil is horticultural oil diluted in water. Horticultural oil is available at most nurseries. As a dormant spray, the horticultural oil is less diluted than it is when its used after plants have leafed out.

The importance of the horticultural oil for the organic rose gardener is that it suffocates many pest and their eggs before they become active as the weather warms up. It’s good as a control for aphids, spider mites, scale, sawfly, and thrips.

The dormant oil should be applied all over the canes of the roses. The easiest time to do it is after pruning because all the unnecessary wood has been removed; but, if you will not complete your rose pruning until the leaves have already begun to emerge, do it now.

The only brand that I know of is Bonide All Seasons Horticultural & Dormant Spray Oil (see photo below).

http://rcm.amazon.com/e/cm?t=heirlgarde-20&o=1&p=8&l=as1&asins=B000BX4RNW&fc1=000000&IS2=1&lt1=_blank&lc1=0000FF&bc1=000000&bg1=FFFFFF&f=ifr

For related posts on Rose Pruning, see:

http://heirloomgardener.blogspot.com/2008/02/how-to-prune-roses-part-i-introduction.html

http://heirloomgardener.blogspot.com/2008/03/how-to-prune-roses-part-ii-old-rose.html

Q: How Do You Keep Deer Out Of The Backyard? A: The Deer Fence

Chatham, New Jersey is overrun by deer. It is not uncommon to see shameless groups of deer grazing in our neighbors’ yards or strolling down the street. The first victims are the deer’s favorites–like ewe hedges, hostas and hydrangeas. By the end of the season, their appetite expands to include some of the deer resistant plants (so called by our local nursery), such as cone flowers and shasta daisies.

In order to keep the deer out of our backyard, we have installed a six foot tall wooden fence. For added protection, the fence posts (four by fours) are ten feet tall and strung with very strong, weather-resistant, plastic-coated wiring. There are three rows of wire above the fence, each spaced about one foot apart.

Aesthetically, the wiring is virtually invisible from a distance and does not take away from the beauty of the garden as some traditional deer fences do. In addition, we have topped many of the posts with bird houses.

Vegetables and Herbs: How to Build Raised Vegetable Beds (on a Slope/Hill)

In my children’s garden, my children and I grow vegetables in addition to flowers. For the last two years, we used the same raised bed construction that I used in the side garden:

http://heirloomgardener.blogspot.com/2007/11/creating-space-for-garden.html

These were short raised beds constructed with six inch wide ipe wood. You can see a picture of one of these beds below from last summer with heirloom lemon cucumbers:

The rabbit fencing around the cucumbers was to keep the resident groundhog from eating the cucumbers in the same way he did the tomatoes.

Towards the end of the summer, we visited New York Botanical Garden’s Home Gardening Center (http://www.nybg.org/hgc_online/hgc_onsite/) and were inspired by their raised beds that were significantly taller than the ones we had constructed. Thus, once we had harvested the last of our cucumbers and zucchinis, my husband deconstructed the old beds and built the new ones you see below:

Ipe was too difficult to work with and costly, so we made these out of cedar wood. We purchased standard six by one inch, un-treated ten foot planks and had them cut in half. Each box (two of three are pictured) is made of three planks on three sides and four planks on the fourth side because our entire property is on a slope. Two additional boards are placed on top on either side to create a place where you can sit, place tools, or when the vegetables have grown, stand.

We filled the bottom of the boxes with compostable garden waste. On top, we added a mix of composted cow manure, Bumper Crop and top soil. Then, to protect the soil, we sowed a cover crop of winter rye that I purchased from Johnny’s Seeds (http://www.johnnyseeds.com/). The winter rye will be turned over in the spring adding even more organic material to the soil.

The overall result was a neater looking garden that will hopefully produce an even more robust crop next year.

*****

For a follow-post on organically preparing the soil for planting, click here:
http://heirloomgardener.blogspot.com/2008/03/raised-vegetable-beds-organically.html