Pets in the Garden: Five Reasons Why Cats Are Great for Gardeners

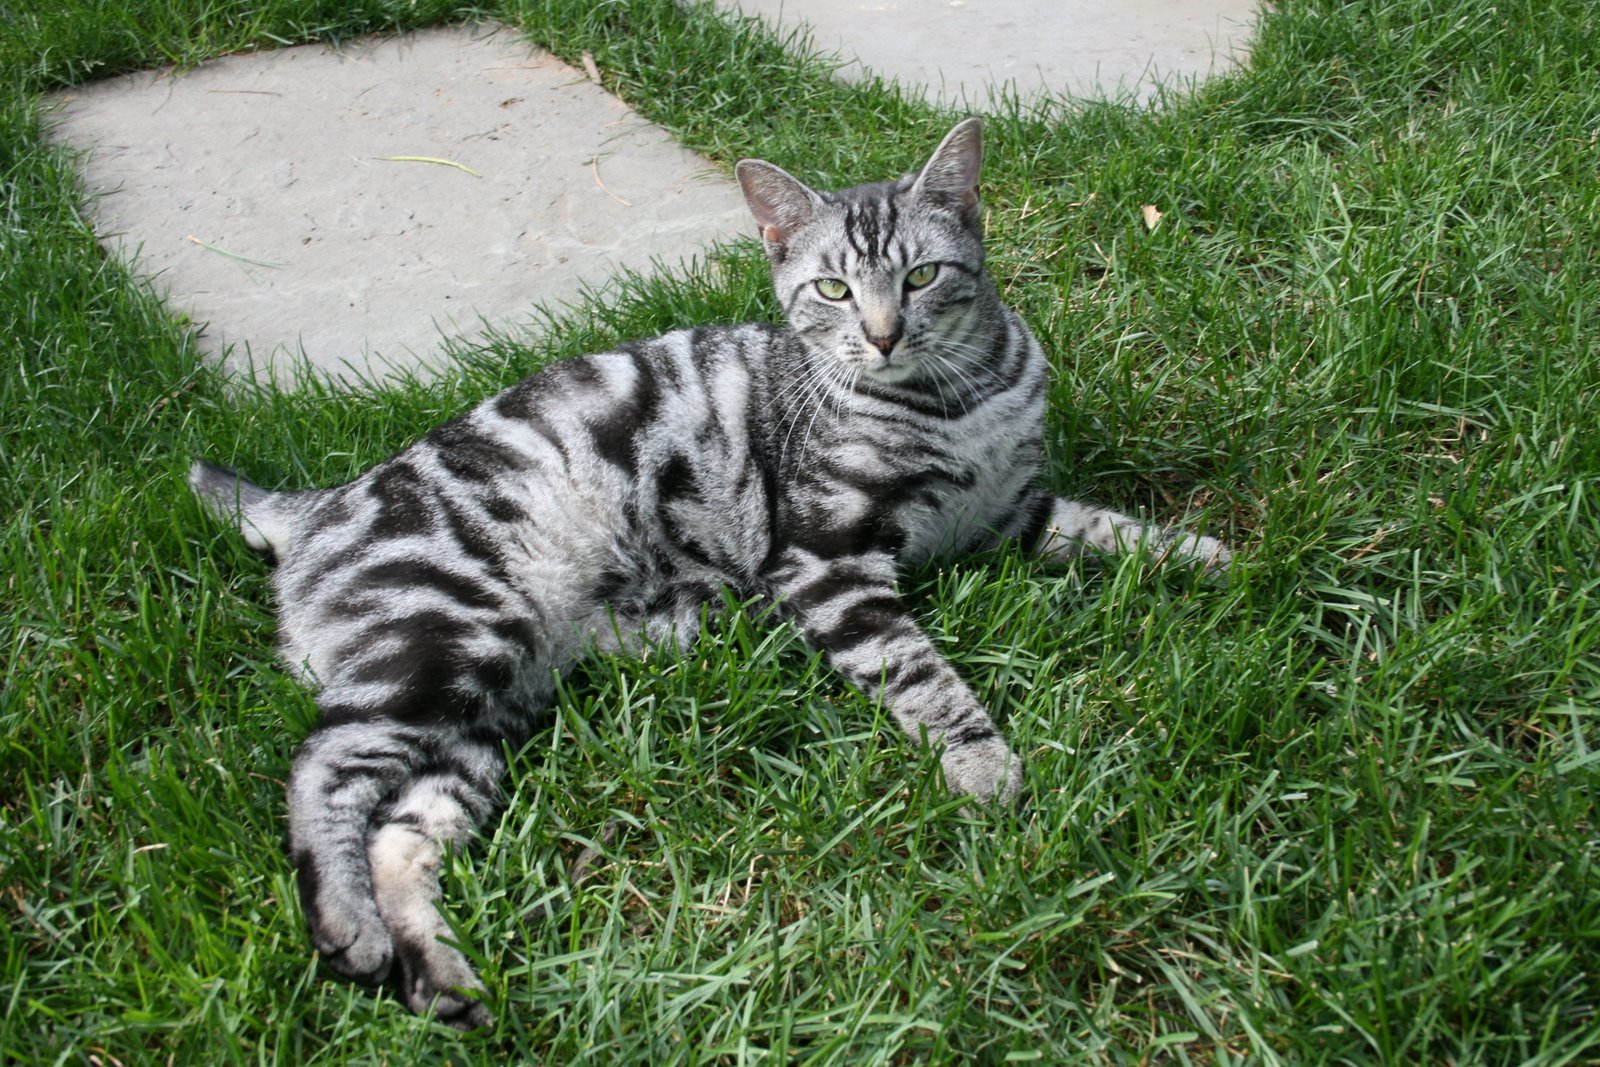
This month’s Garden Bloggers’ Design Workshop at Gardening Gone Wild is on Pets in the Garden. Of course, I think I have the best cat in the world, but who doesn’t think their pet is the greatest? His name is Luna (yes, a little feminine for a tom cat, but we first thought he was a she). For anyone who has any question about whether cats are good for gardeners, here are five reasons why I think cats are perfect for gardeners:

1. Pest Control. My cat has significantly reduced the number of pests in the garden. He is about 18 months old and as he has grown older, his prey has grown larger–he started with small field mice and voles, moved up to chipmunks, and recently caught a squirrel. And for each one he catches, I am sure he scares off many more. I’m hoping he can catch or at least scare off the rabbits, though I’m afraid the groundhog is wishful thinking.

2. Companionship. When out in the garden, my cat follows me around. He quietly observes what I am doing and then wanders off, but always come back.

3. Gentleness. Unlike those other four legged pets that like run through and dig in the beds, my cat is very, very gentle. Yes, he does occasionally chew on some of the ornamental grasses, but pretty much leaves everything else alone.

4. Litter Box Trained. My cat is litter box trained and goes into the house when he has to go. While I’ve never noticed any unwanted deliveries in the garden, we do keep a cover on the sandbox, just to be safe.

5. Child Friendly. Of course, my children love the cat and the cat is quite friendly with them. He lets them hold him and pet him and doesn’t even mind when my toddler tries to boss him around.

Garden Bloggers’ Bloom Day February 2009: Picture of Forced Magnolia Branches

Well, aside from a few more of the snow drops that I photographed for last month’s Garden Bloggers‘ Bloom Day, there is nothing that is blooming outside in the garden. Inside, I have moved on to forcing branches, which I wrote about in this post last week. Above, is a picture of a one of the magnolia blooms currently in my family room. I can’t wait until next month for the garden to start showing more signs of spring. Check out all of the bloom day posts from around the world over at May Dreams Garden.

Pictures of House Wren, Goldfinch, Tufted Titmouse and Downy Woodpecker Bird Nests from the Garden

One of the many things that I enjoy about being a gardener is the opportunity for my family to observe all of the native wildlife close-up, particularly the birds. In preparation for spring, we cleaned out all of the bird houses and nesting boxes around the yard and it is so amazing to see how each type of bird nest is made of different materials from the garden. Here are a few of the nests that we found and my best guesses on who made them:

The house wrens made their nest exclusively with twigs. Unfortunately, we discovered a few babies that didn’t make it out of this nest last year. They made this nest in one of the small bird houses on Goldberry Hill (picture of a house wren nest).
The goldfinches (?) made their nest mostly of wood shavings, small pieces of cedar mulch, and coarse grasses. I think it was made by goldfinches because of the yellow goldfinch-looking feathers I found in the box, but Paul H. below in the comments suggests it may not be. They made this in one of the nest boxes on the deer fence (picture of a goldfinch nest).
The tufted titmice win the contest for the most comfortable-looking nest. They made their nest mostly of leaves and fine grasses. They made this nest in the children’s fort. Interestingly, the nest was built vertically like a cave instead of horizontally like a cup (picture of a tufted titmouse nest).
The downy woodpeckers (?) made this nest mostly of wood shavings topped with leaves. Thanks to Paul H. in the comments below for the identification (picture of a downy woodpecker nest).

More Gardening Project Ideas: 10 Inventions From the Garden Shed

If you like to make things for your garden, check out this post, “10 Inventions From the Garden Shed” from Gardening Tips ‘N’ Ideas. Stuart writes: “Well, it seems that gardeners are no slouches either when it comes to inventing ‘stuff’ – stuff that might save you money, make a gardening task seem more enjoyable, or turn unwanted resources into a masterpiece. The level of genius required is not mensa-like but it does seem that these individuals have the ability to see outside the box.” I was flattered to see that my humble planting square made the list. Thank you Stuart!

Calendar For Forcing Branches: When to Cut Various Flowering Branches for Forcing

By February, my home is devoid of lingering Christmas decorations and most of my forced bulbs are done. At this point, I turn to the outside once again to bring a little bit of spring into the house: I begin forcing various branches from the garden.
~
I try to cut branches at least the diameter of a dime in mid afternoon when it’s warmest. I immediately place the branches in warm water with a floral additive. You can also make the floral additive with a little bleach, sugar, and lemon juice. For a half gallon of water, I would add 4 tablespoons of lemon, 2 tablespoons of sugar, and 1/2 teaspoon bleach. The closer to the natural bloom time the more quickly branches will force.
~
During February and early March, I go out about every seven to ten days for branches. My order of forcing is generally as follows:
~
Forsythia (can be started from early January)
~
Pussywillow (pictured)
~
Red twig dogwood

Ceris ‘Forest Pansy’ (pictured)

Flowering Pear

Flowering Cherry (pictured)

Quince (pictured)

Amelanchier (last year started 28 February)

Crabapple (last year started 6 February and it began to bloom 25 February, pictured)

Bridal Wreath Spirea

Flowering Dogwood
~
Related posts:
~
Forced Branches: Quince, Crabapple, Willow, Ceris, Dogwood, and Forsythia
~
Cut Flowers, Branches and Foliage: Bringing Early Spring into the Home
~
Forced Branches and Bulbs: Forsythia, Hyacinth, Tulips, Muscari and Crocus

How to Keep Track of What Plants You Have Bought, Where They are Going, and What You Still Need to Buy: The Garden Planning Binder

This month’s Garden Bloggers’ Design Workshop at Gardening Gone Wild is on Labeling and Record Keeping. Like many of the other bloggers, I have tried many different methods of labeling and record keeping with varying degrees of success over the years. For example, I tried the wooden and metal markers, but I didn’t like how they looked in the garden, so I no longer use them. In recent years, I have settled on three means of record keeping: the Garden Journal, the Garden Planning Binder, and the photographs of my garden.
~
In terms of the Garden Journal, I wrote a separate post about it last year that I won’t repeat in full here: “I find the garden journal is an invaluable tool to help me keep track of my garden and plan for the future. I started keeping a garden journal about six years ago. Before then, I would keep notes at random on successes, failures, and sources of inspiration. These I would easily misplace and forget about.”
~
I used to try to keep track of absolutely everything in my Garden Journal, but one aspect of my record keeping kept slipping through the cracks: what plants I had ordered, where I planned to plant them, and what I still needed to buy. I would print out my online orders and put them in a file folder to read alongside my Garden Journal, but it was just too disorganized. Boxes of plants that I had ordered in the fall and winter would arrive on my doorstep in the spring and I would forget why I had ordered such and such a plant and/or where I planned to plant it. Sometimes I would remember the space I was trying to fill, but other times I would not and need to find a home for it. At some point later in the season, the intended space would present itself and I’d remember what I had planned to plant there, causing me to move the plant or change the plan.
~
My Garden Journal needed a friend. Thus, the Garden Planning Binder was born. I bought a large three-ring binder and anytime I ordered anything–trees, shrubs, bulbs, perennials, annuals–I would print out the order form, write down where I planned to plant it, punch holes in it, and put it in the binder. This works on purchases for my containers, as well as my beds. Also, by keeping all of the receipts together, I am better able to keep track of my budget. Now, when the boxes arrive in the spring, I just find the matching order in the Garden Planning Binder and immediately plant the plants where they are supposed to go.

***

One unrelated note about labeling dahlia tubers. If you over-winter dahlia tubers, here is one specific record-keeping suggestion: write the name of the dahlia on the actual tuber with a black Sharpie marker. I used to keep them in paper bags with the name of the dahlia on the bag, but I found that the paper bag disintegrated by the next spring.

Organic Pest and Fungus Control: Garlic Barrier – Yes, It Really Works

Last year, I picked up a pest control recommendation from HRH The Prince of Wales in his book, Elements of Organic Gardening (you can read my previous review here). Garlic Barrier is almost 100 percent garlic oil which can be mixed with water and sprayed on plants, including vegetables. It imparts no garlic taste and it repels both insect and mammal pests. This year, I sprayed it throughout my garden once every other week from April to October.

1. Does garlic barrier repel mammals? In terms of controlling mammals, my main concern was the groundhog which likes to eat both vegetables and flowers. My ultimate test was trying to grow dahlias in unprotected areas of my garden. If you don’t know, dahlias are also known as groundhog candy and I have never been able to grow them outside of my fenced-in, groundhog-proof Cutting Garden (you can read about the groundhog-proofing here). This year, I was able to grow dahlias everywhere–in the Front Border, in the Rose Garden, in the Long Border, among other places.

2. Does garlic barrier repel insects? In terms of controlling insects, the garlic barrier significantly reduced the number of Japanese Beetles on the roses throughout the garden. It did not repel the potato beetles on my potato plants, so either it doesn’t work against potato beetles or the potato plants need to be sprayed more frequently (you can read about how we controlled the potato beetles here).

3. Does garlic barrier protect against fungal diseases? Because I grow old roses, I do not have a problem with fungal diseases on most of my roses. However, the Bourbons and Hybrid Perpetuals are susceptible to black spot towards the end of the summer. While garlic barrier is not advertised as fungicide, I thought that since it is used as such in many medicinal home remedies it may work as a fungicide on plants. I found very little black spot compared to prior years. I didn’t have a control patch of roses, so there my have been other factors.

4. Where can you buy garlic barrier? Unfortunately, garlic barrier is not readily available at my local nurseries. I was able to purchase it online from Gempler’s, a great source of all sorts of gardening and other supplies: http://www.gemplers.com/shop/garlic-barrier. I purchased the one gallon container which lasted the entire season. From Gempler’s: “Protect your plants and ornamentals from pest damage with easy-to-use Garlic Barrier. 100% natural deer repellent, rabbit repellent, rodent and insect repellent.”